
🌱 Welcome to the a seed for sales Hub
If you've arrived here from your copy of a seed for sales, welcome! 👋
This is your companion Hub, packed with the graphics, sales copy, resources and step-by-step tutorials you'll need to put what you've learned into action.
And if you've somehow stumbled across this page without owning a copy... 👀
You can get your own copy of a seed for sales here if you don't have one 👇
Already have your copy? Perfect - let's get your digital seed planted! 🌱
Heads-up: Some links on this page are affiliate links. We may earn a commission if you subscribe to a paid plan through one of these links, at no additional cost to you. However, you do not need to sign up for a paid plan to sell a seed for sales using this method.
Set Up Your Store
This guide will show you step-by-step how to set up an online store to sell a digital products such as 'a seed for sales'.
Part 1: Create your account
Click the button below to create your free account with Systeme — the platform we'll use to set up your digital store and start selling a seed for sales.
For the purposes of this guide, we're going to use Systeme because you can get started for free, making it a simple and cost-effective option if you're just starting out and only plan to sell a seed for sales. You can use other platforms such as Stan Store or Beacons if you prefer, but some platforms charge monthly fees or take a percentage of your sales.
FACT: We use Systeme to run our entire business, so you're learning to use the same platform we use ourselves for everything - creating our websites, selling digital products, email marketing, building sales funnels, and creating and selling online courses.
Mark & Jill | Creators of a seed for sales and owners of DigitalProductsLounge.com and MJMShiers.com
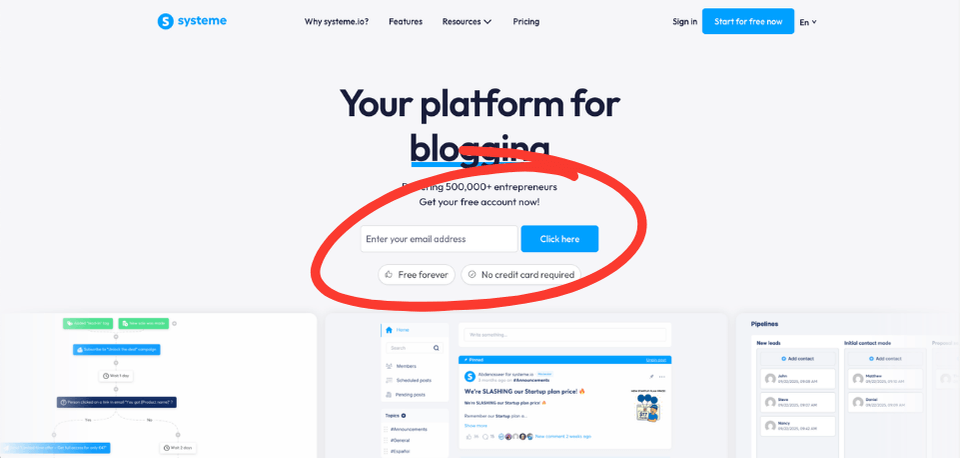
Enter your email address and click on the 'Click here' button to create your free Systeme account.
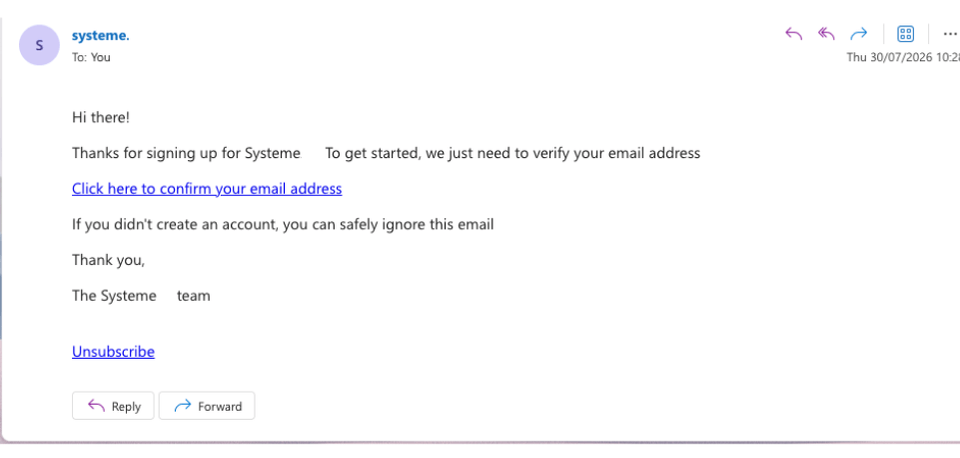
Check your email inbox for a confirmation email from Systeme and confirm your email address to continue.
Enter your first name, last name and choose a secure password for your Systeme account.
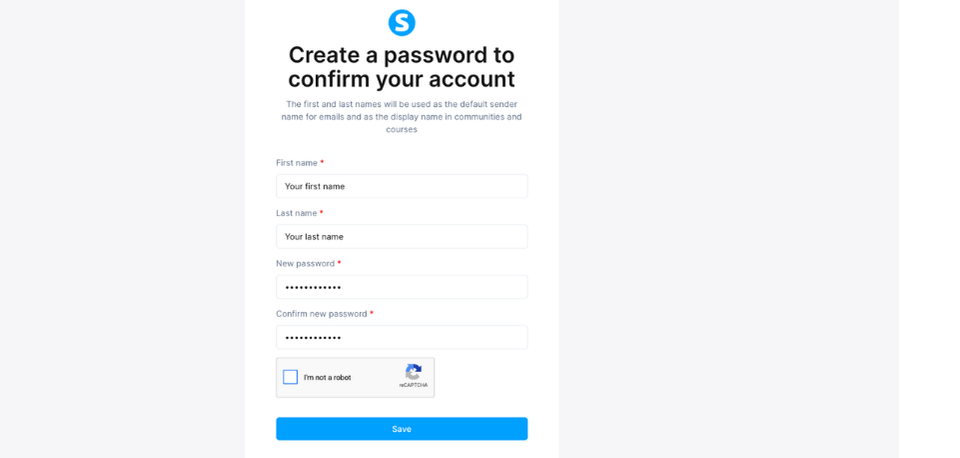
Press the 'Save' button when you have done that.
🔐 Keep your password secure: Choose a strong, unique password that you don't use for any other account. Avoid using obvious information such as your name, date of birth or the word "password". Never share your password with anyone, and consider using a password manager to store it securely.
You'll be using this account to manage your store, products and customer information, so keeping your login details secure is important.
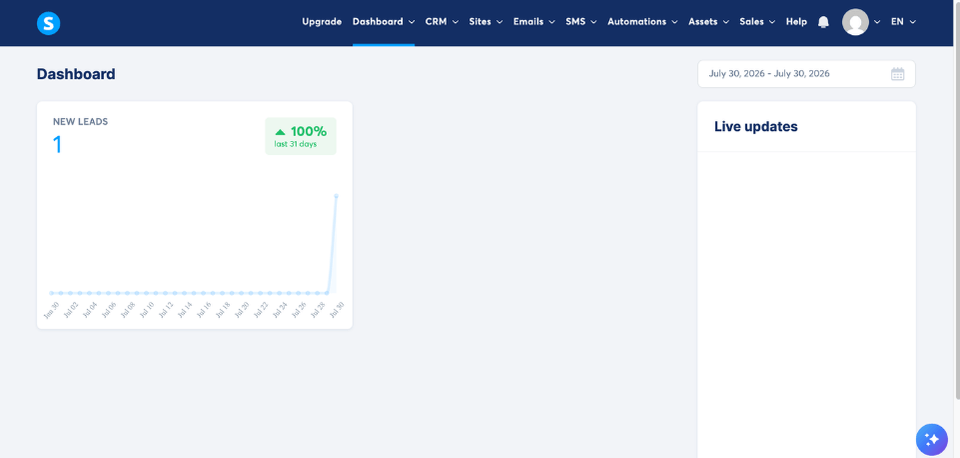
Answer a few simple questions to complete your account setup - you will then be taken to your own Systeme dashboard.
Part 2: Set up how YOU will get paid for selling a seed for sales
Before we get to the fun part — setting up your own digital product store and listing a seed for sales for people to purchase from you — you first need to set up how you'll receive payments from your customers.
This is an essential part of the tutorial because, quite simply, if you don't have a way to get paid, you can't get paid! 💷
Don't worry — we'll walk you through the steps so you can get your payment methods connected and ready to accept your first sale.
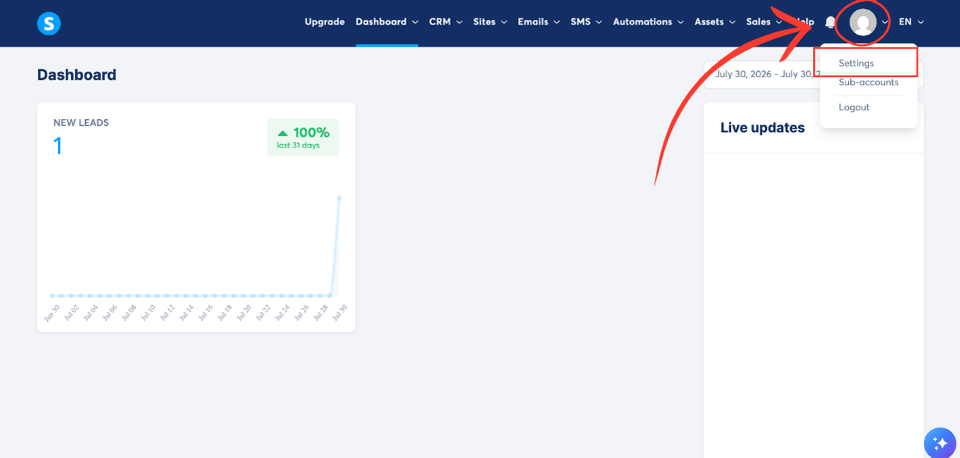
In your Systeme dashboard, click on the profile image in the top right, then click on 'Settings'
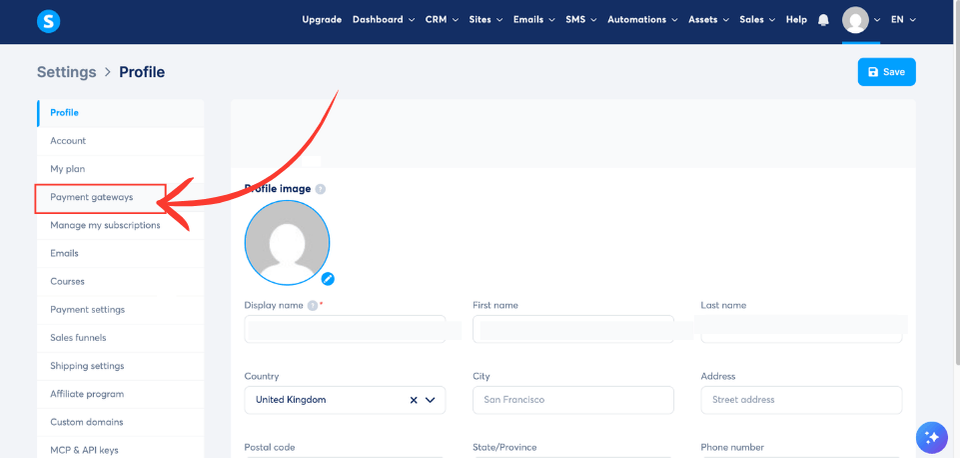
Click on 'Payment Gateways' on the left hand side menu in Systeme
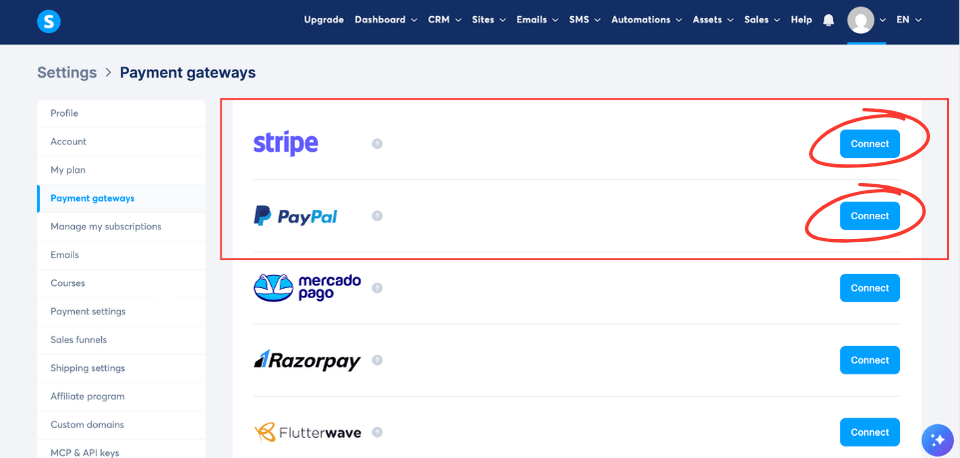
To receive payments from your customers, you'll need to connect a payment provider to your Systeme account. Stripe and PayPal are two of the most popular options, although other payment providers may also be available depending on your location.
You can connect Stripe, PayPal, or both — the choice is yours. Simply click the “Connect” button next to the payment service you want to use and follow the instructions provided by the payment provider to complete the connection.
The setup and verification process is handled directly by the payment provider, so you'll need to provide any information they request before your account can accept payments.
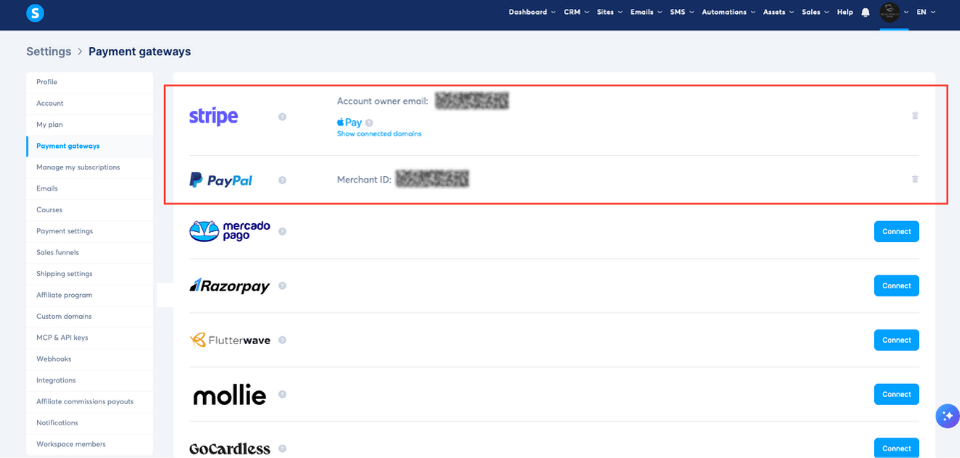
Once you have successfully added your payment methods (so you can get paid), they will show up in the payment gateways section in Systeme (as shown in the screenshot below)
Part 3: Create your digital product store
In your Systeme dashboard, go to 'Sites' and select 'Creator stores'. Click on the 'Create' button to create your store.
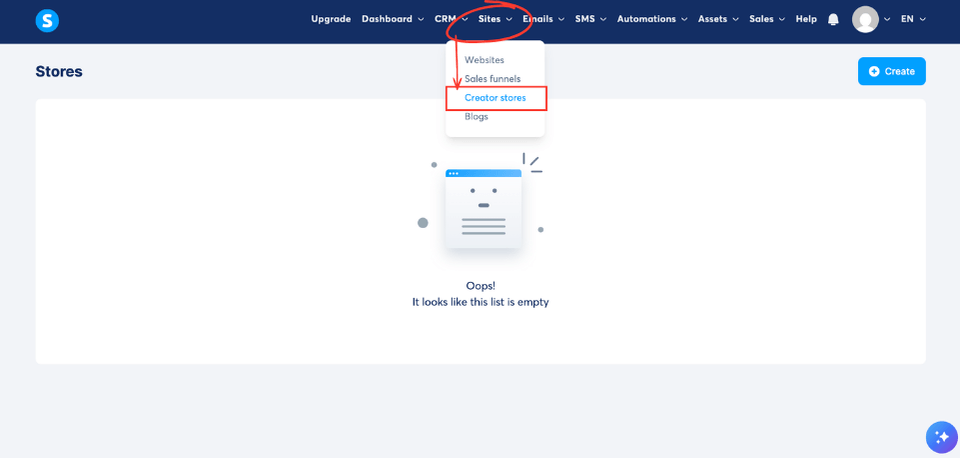
Type a suitable name for your digital product store into the “Name” box.
Don't worry about the domain name at this stage. Systeme provides you with a basic Systeme domain that you can use for your store, so you don't need to purchase a domain name to get started.
You can always purchase and connect your own custom domain later, such as www.yourbusinessname.com, but this isn't essential when you're starting out and selling a seed for sales.
Keep it simple for now — you can always upgrade your setup as your digital business grows. 🌱
Click 'Save' when you have given your store a name.
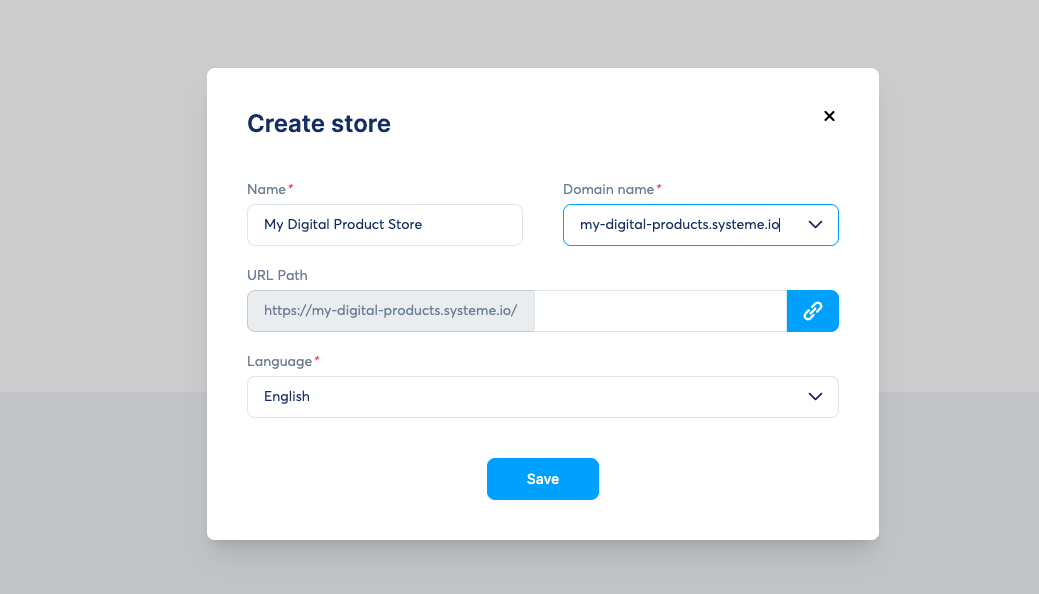
Your digital product / creator store will then be set up in Systeme (as shown below)
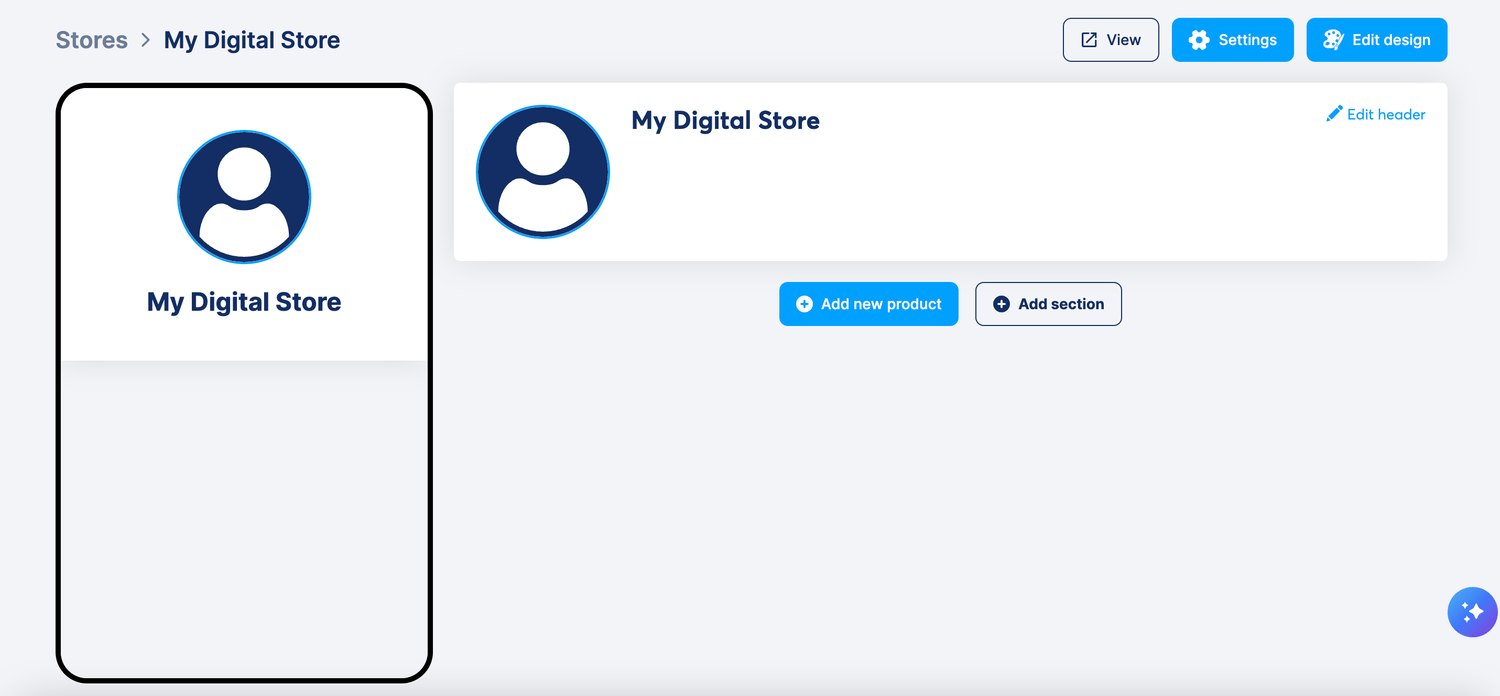
Part 4: Customise the appearance of your digital product store
Before you start adding products to your store, such as a seed for sales, it's a good idea to customise how your store looks and feels to your customers.
This is your digital shop window, so take a few minutes to make it look clean, professional and consistent with your own brand. You can add your logo, choose your colours, customise the layout and make a few simple changes so that your store feels like your business.
Don't worry about making it perfect - you can always come back and make changes as your business grows. 🌱
In your creator store which you will find under 'Sites' inside Systeme, click on the 'Edit header' link.
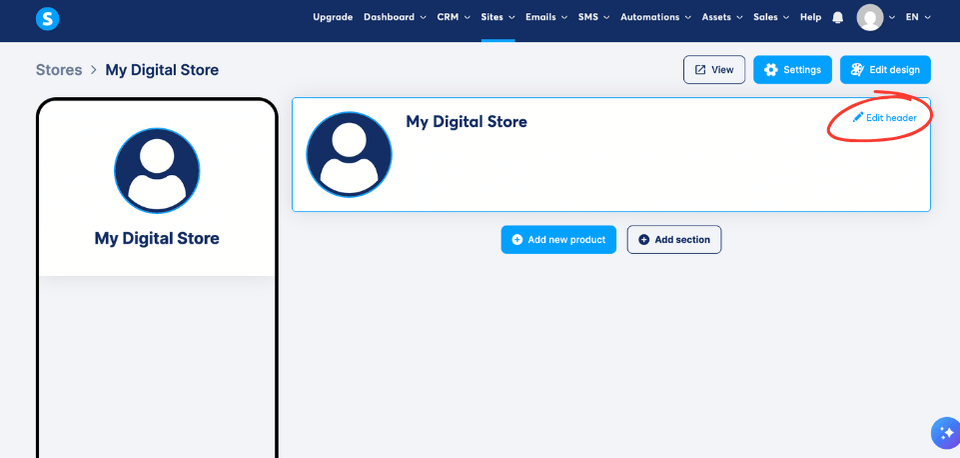
You can change the display name for your store in the 'Store display name' box and you can upload a profile picture or logo for your store.
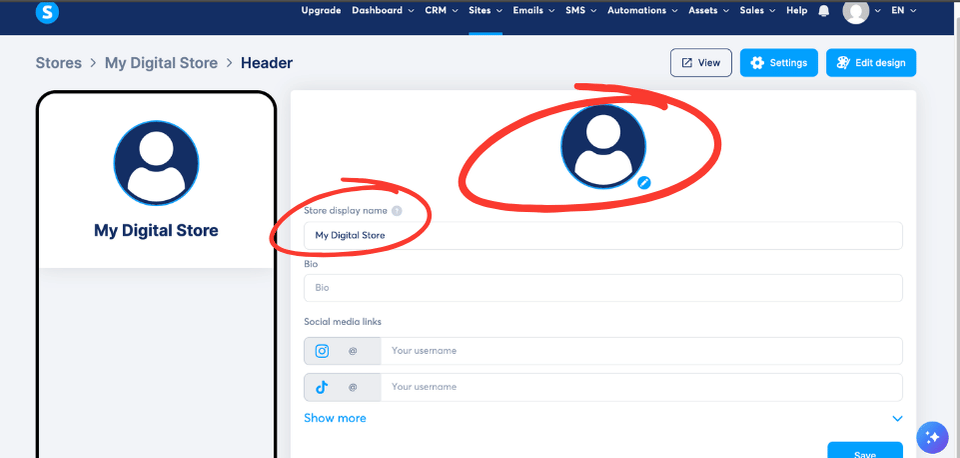
In this example, I will upload a logo for my store. To upload a picture for your store, click on the profile graphic (shown above).
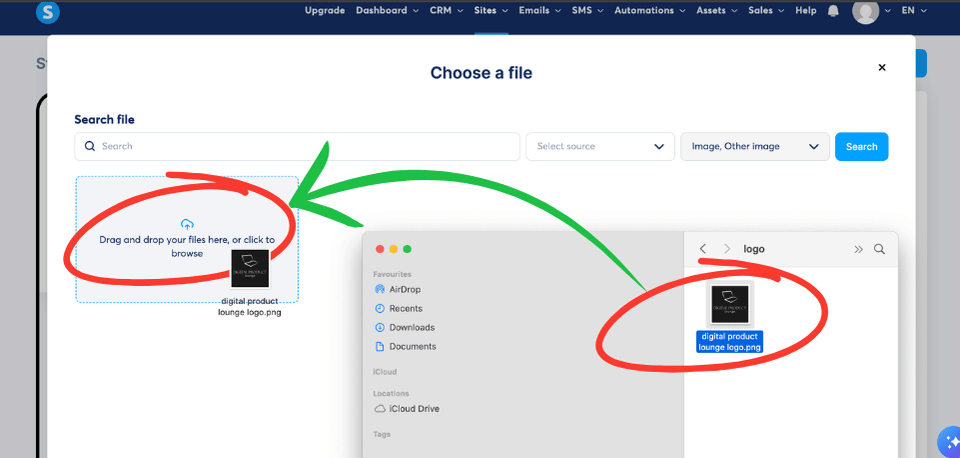
Locate the image you want to use on your computer and drag the image file into the box that says 'Drag and drop your files here, or click here to browse'.
NOTE: If you don't want to drag and drop an image you can simply use the browse feature to find the image file on your computer.
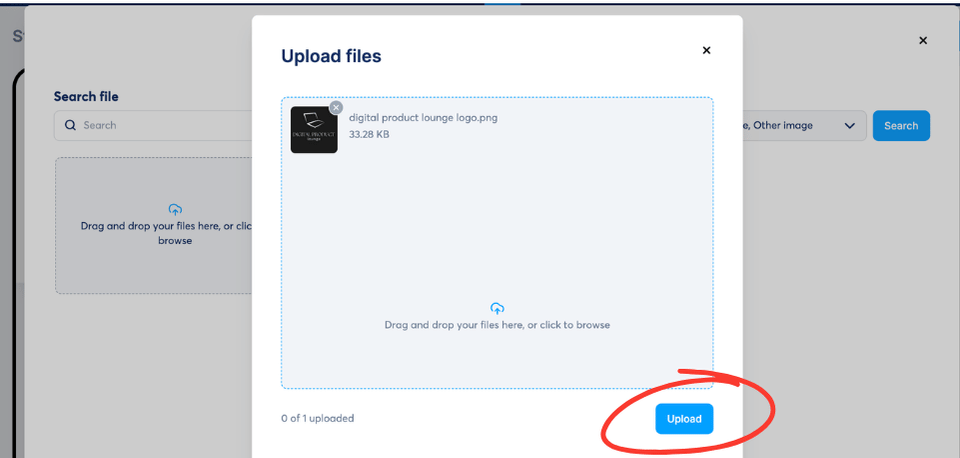
Click on the 'Upload' button to upload your profile image or logo.
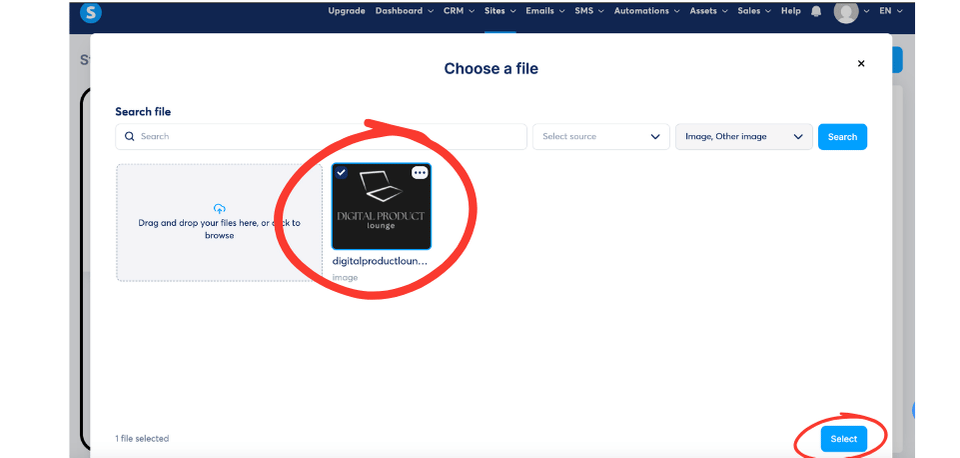
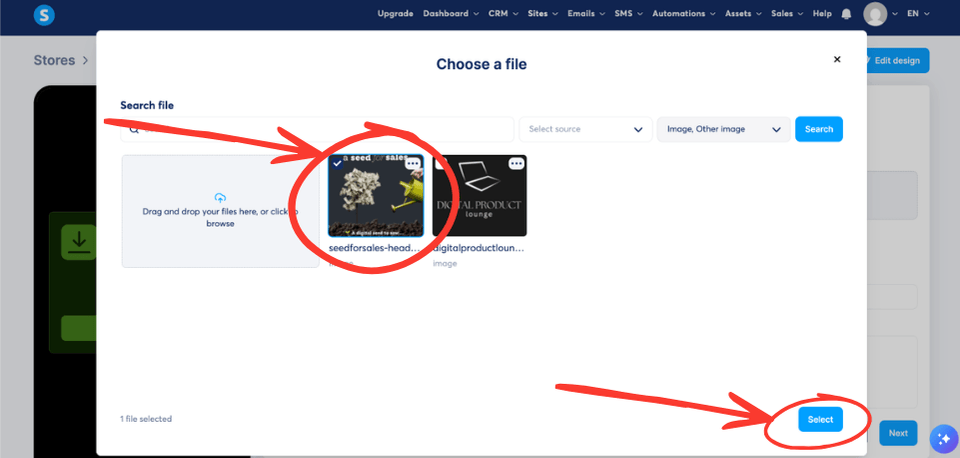
Click on the image so that a tick appears, then click on the 'Select' button.
Your profile image or logo will then be uploaded to your store (as shown below)
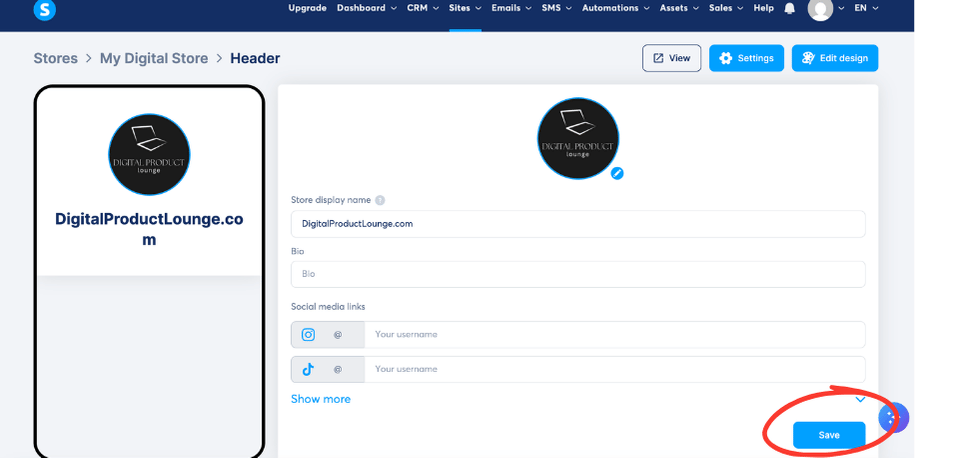
Click on the 'Save' button to save your changes.
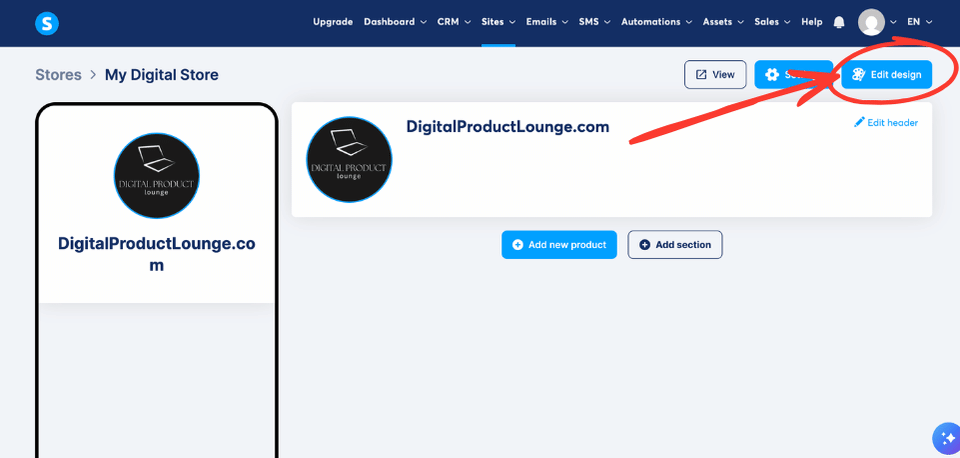
Systeme also gives you several built-in themes to choose from, making it easy to give your store a professional, polished look without needing any design or coding skills.
Click on the 'Edit design' button to access the themes.
Browse through the themes that Systeme has to offer and choose one for your store.
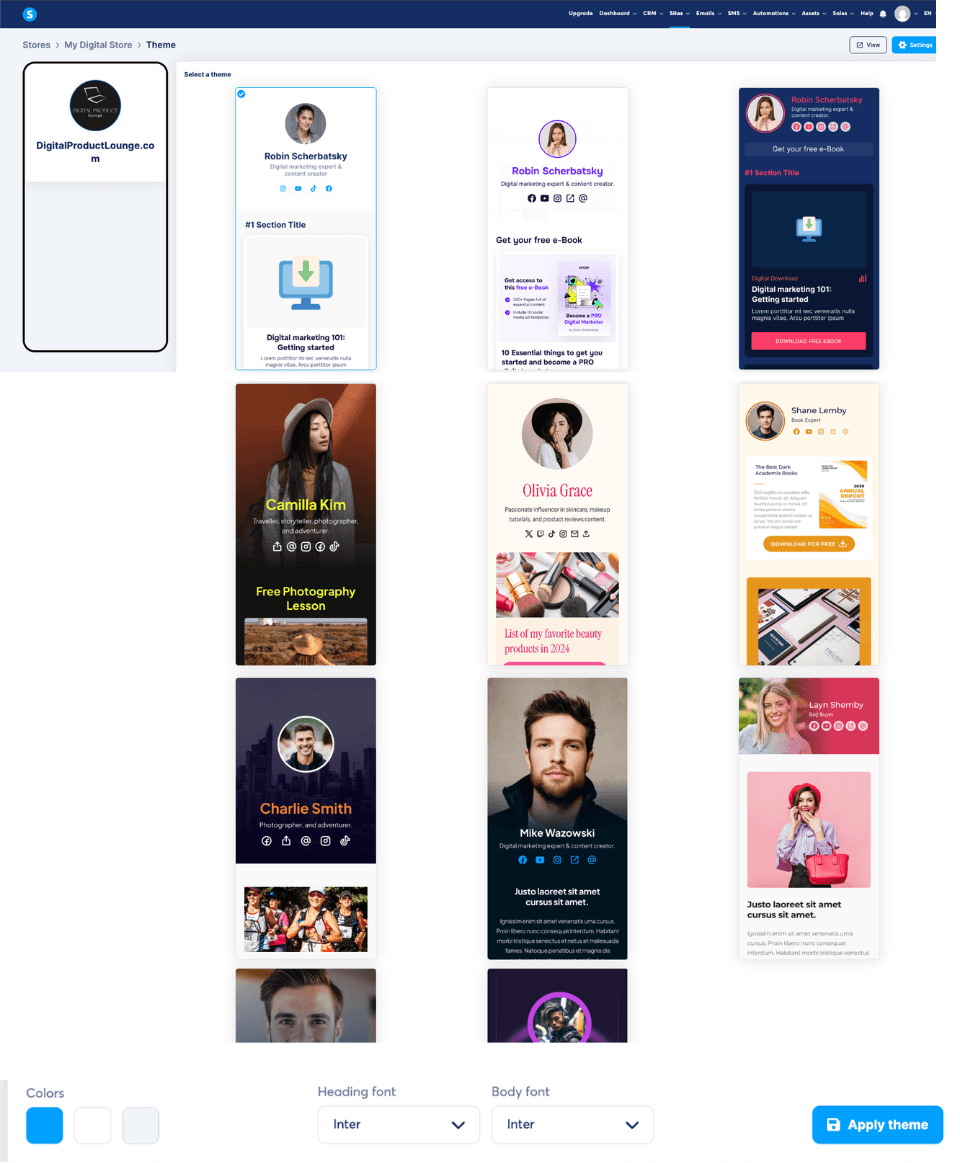
Tip: You can also change the colours for a theme by selecting the 'Colors' button. You can also change the 'Heading font' and 'Body font' if you would like a different font for your digital product store.
When you have finished changing the look for your store, click on the 'Apply theme' button.
Now you are ready to add a seed for sales to your digital product store using Systeme.
Part 5: Adding 'a seed for sales' to your store.
Now it's time to add a seed for sales to your Systeme digital product store.
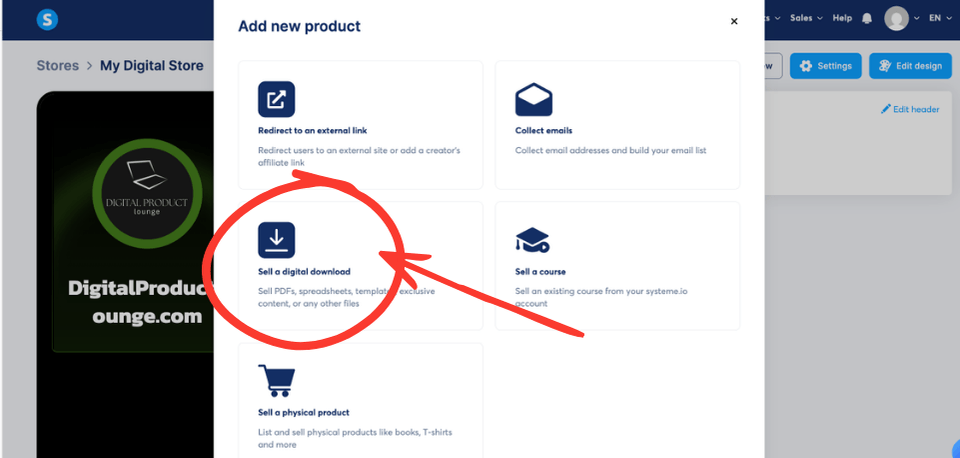
Click on the 'Add new product' button.
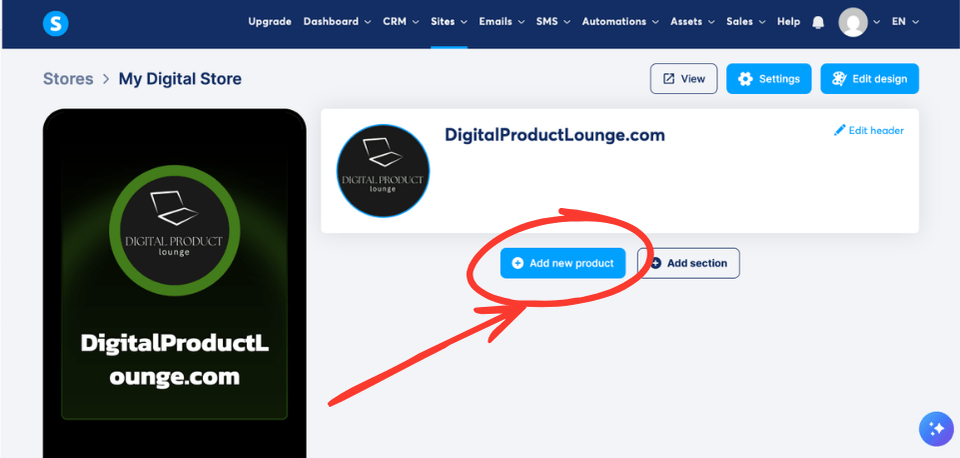
Select the 'Sell a digital download' option (as shown below)
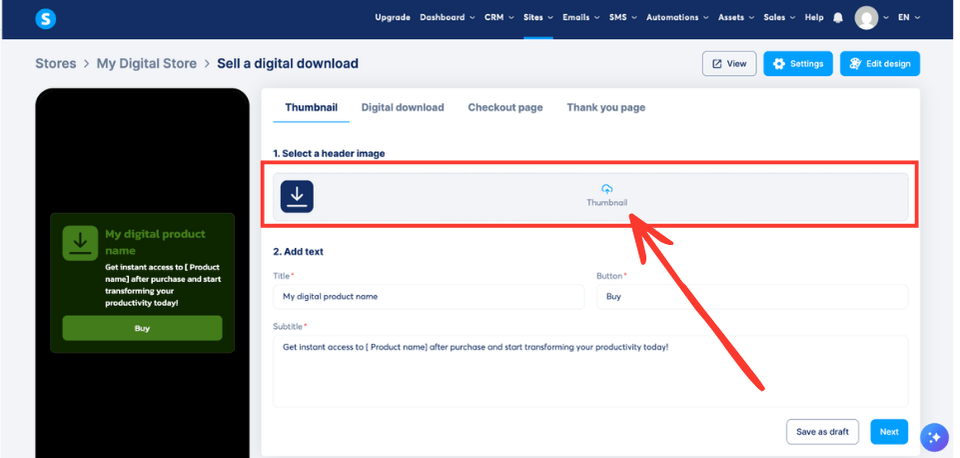
This is where you add the information about a seed for sales.
Start by adding the header image. This will be the image/thumbnail of the product that the user will see in your storefront. Click in the 'Thumbnail' area (as shown below)
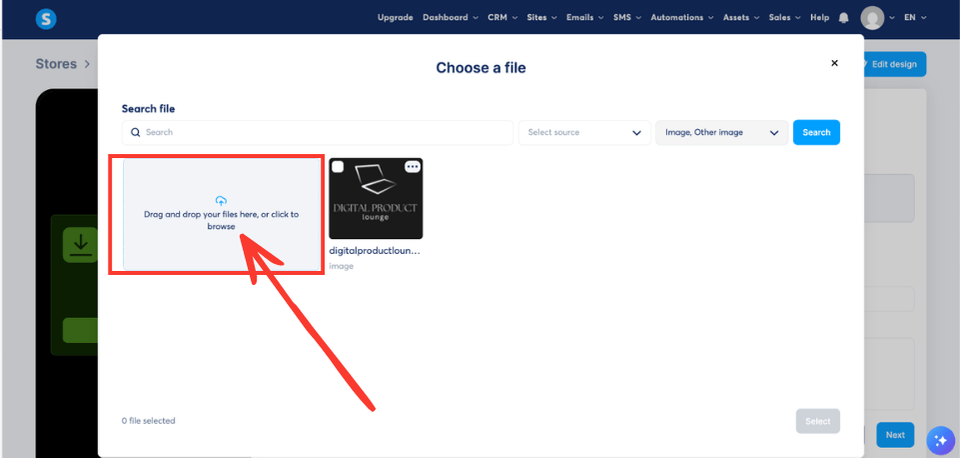
Click on the 'Drag and drop your files here, or click to browse'
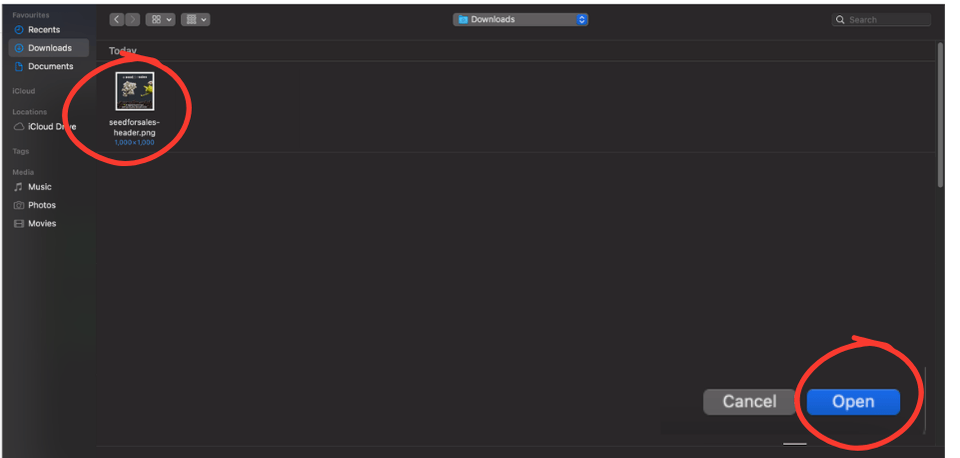
Find the product thumbnail image that you have downloaded to your computer and click on the 'Open' button
Click on the 'Upload' button then select 'Done' when you are finished.
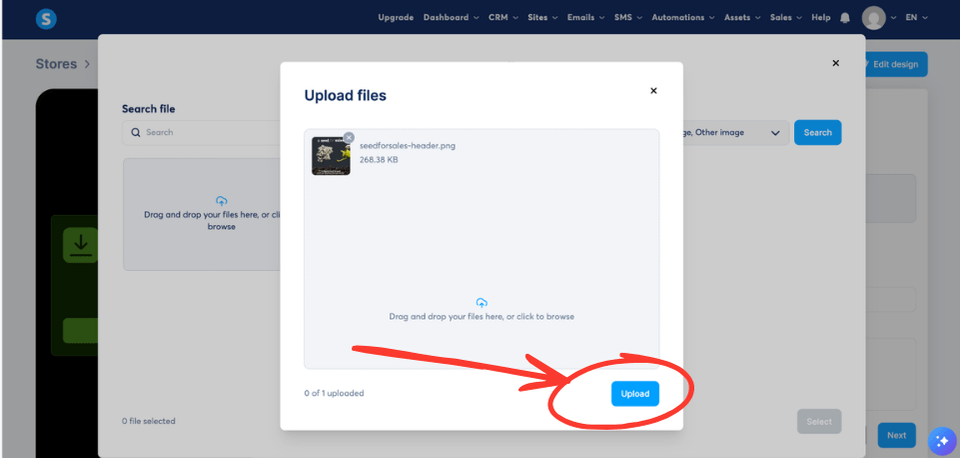
Make sure you select the 'a seed for sales' header image - a tick will appear in the top-left corner. Click on the 'Select' button to continue. The image will then be added.
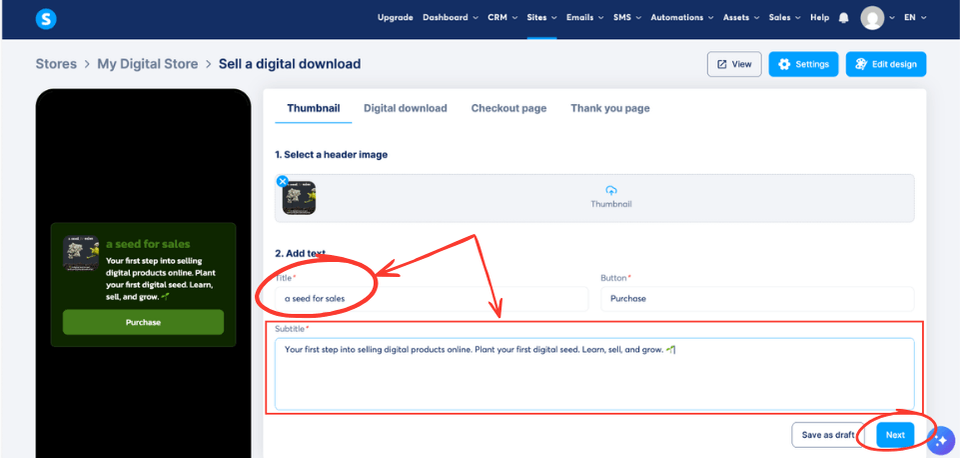
Add the title for the digital product - in this case a seed for sales and enter a subtitle for the product (as shown below) This is what the user will see first when they visit your digital product store. NOTE: A visual representation of your store will be shown on the left hand side.
Click on the 'Next' button to continue to the next section.
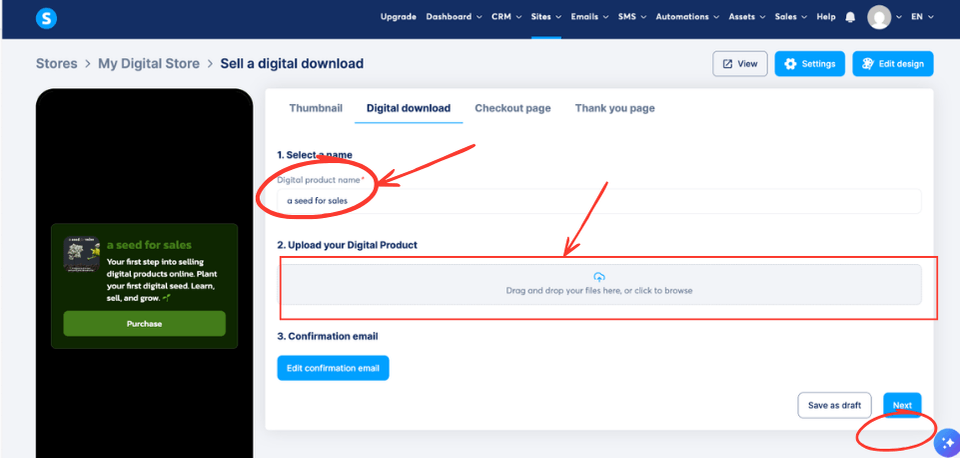
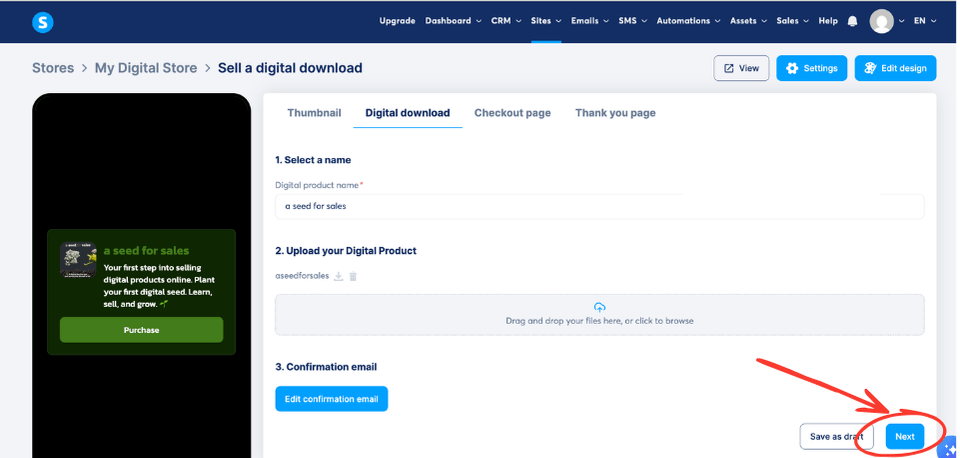
In the 'Digital Download' section, enter the title of the digital product you are selling in the 'Digital product name' box - in this case 'a seed for sales'.
Next, in the 'Upload your digital product' box, drag your digital product into the box (in this example I am adding. the a seed for sales digital product which is a PDF document. This is the file that your customer will receive after they have purchased the digital product from your store.
Once the file has been uploaded, click on the 'Done' button.
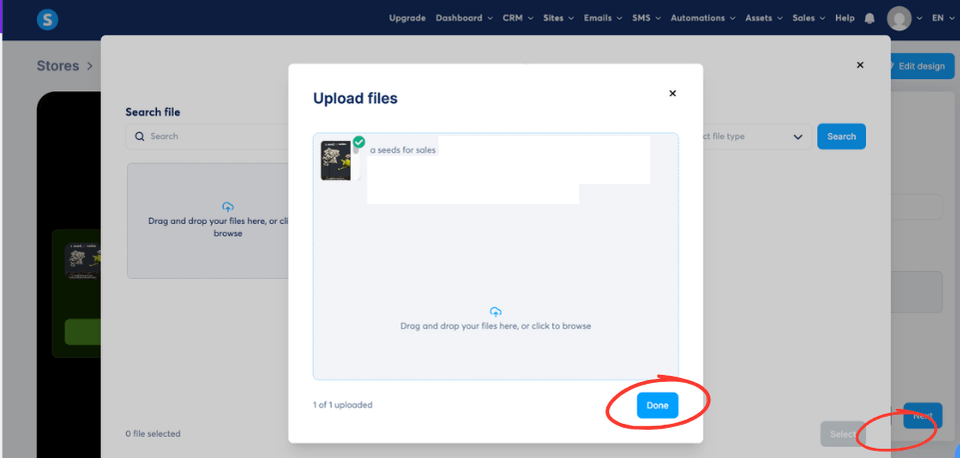
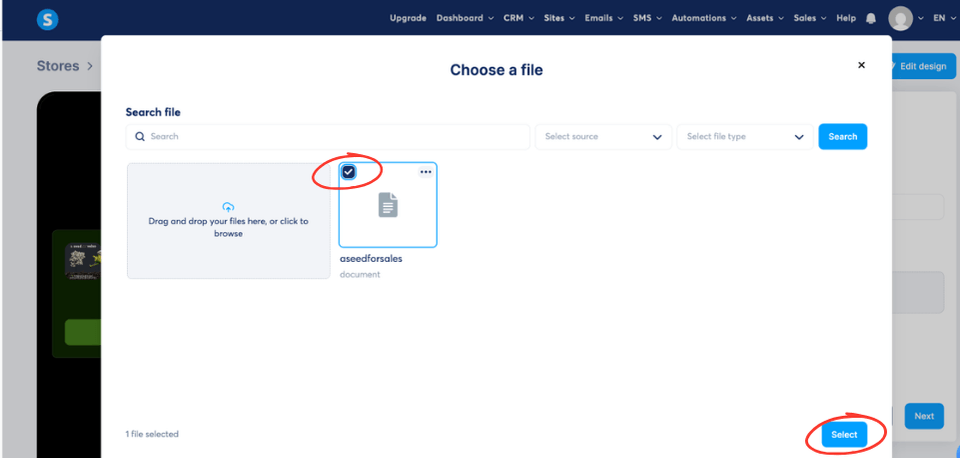
Make sure the you select the 'a seed for sales' file - a tick will appear in the top left. Click on the 'Select' button to continue.
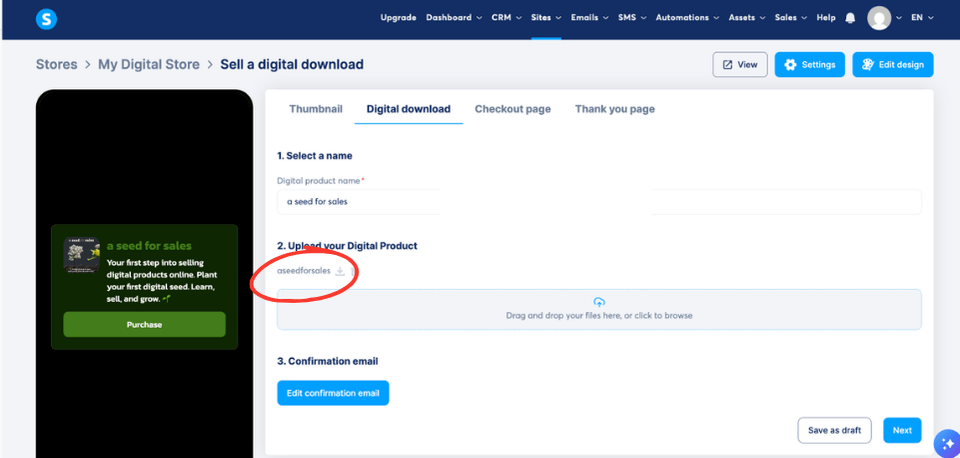
You should now see that the digital product 'a seed for sales' has been successfully added (as shown below)
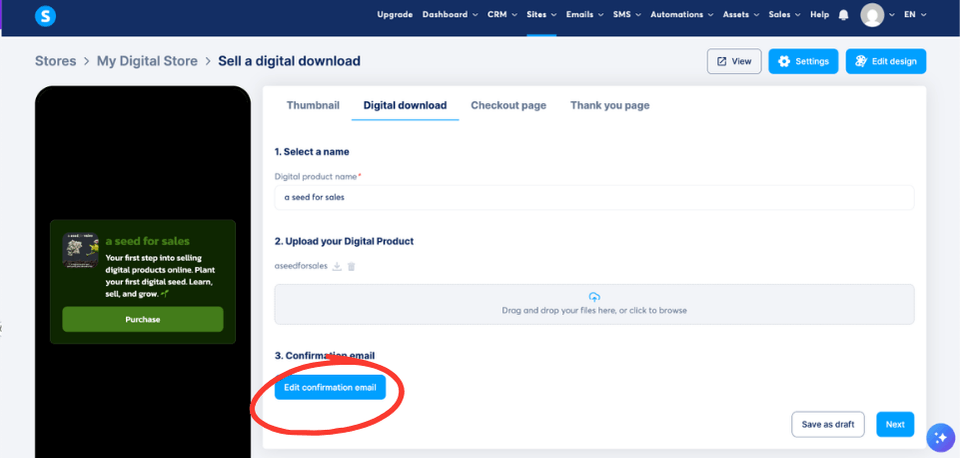
After a customer has purchased the digital product from you (in this example a seed for sales ) they will get sent an email automatically sent from Systeme. If you would like to customise the email that the customer receives, click on the 'Edit confirmation email' button (as shown below).
You can customise this email that the customer receives in the box (as shown below).
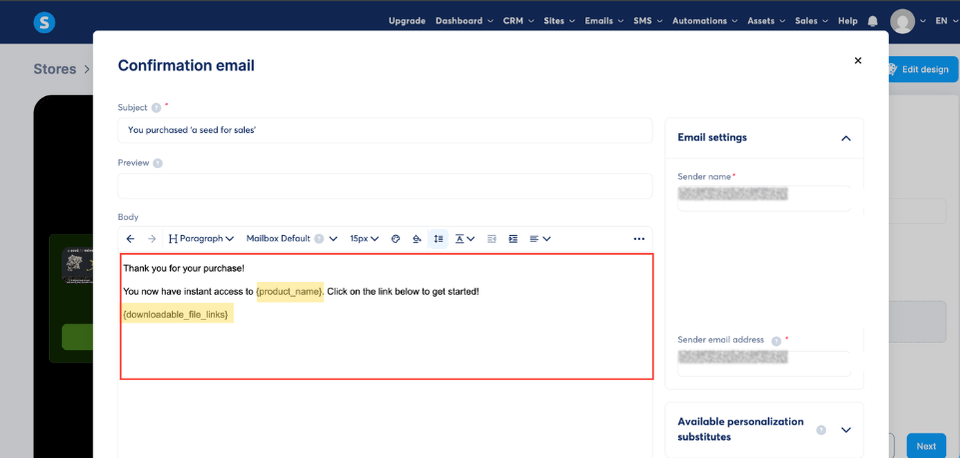
IMPORTANT: Do not remove the {downloadable_file_links} or {product_name} from this section - these are placeholders created by Systeme - removing the file link will result in the file NOT being delivered to the customer. It's best to leave these alone.
When you have finished editing the email, click on the 'Save' button.
Click on the 'Next' button to continue to the next screen.
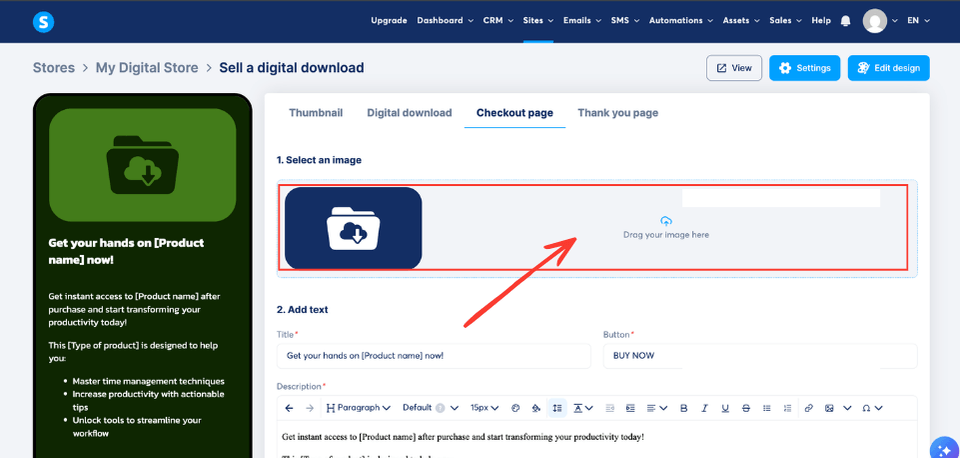
Now it's time to add the main image and more information about the digital product in the 'Checkout page' section.
Start by adding a banner image for the digital product in the 'Select an image' box. This is an image that will be shown to the buyer on the sales page for the product. Either drag the image into the box or browse for the file manually. I am adding a a seed for sales image in this example.
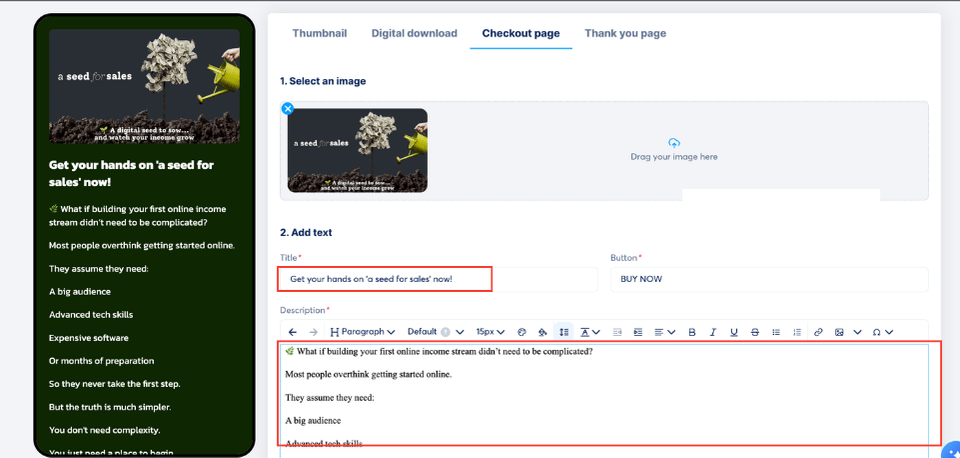
Customise the title in the 'Title' box.
Type in the sales copy for your digital product - in this example I am adding all of the sales copy for a seed for sales.
Once you have added the sales copy, paste it into the 'Description' box in Systeme as shown below.
Scroll down to the 'Collect info' section.
IMPORTANT: Systeme automatically adds 'Email', 'First name' and 'Country' to store these details from your customer - however, you now also need to store the customers last name. To do this, click on the 'Add field' button and choose 'Last name' from the drop-down list (as shown below).
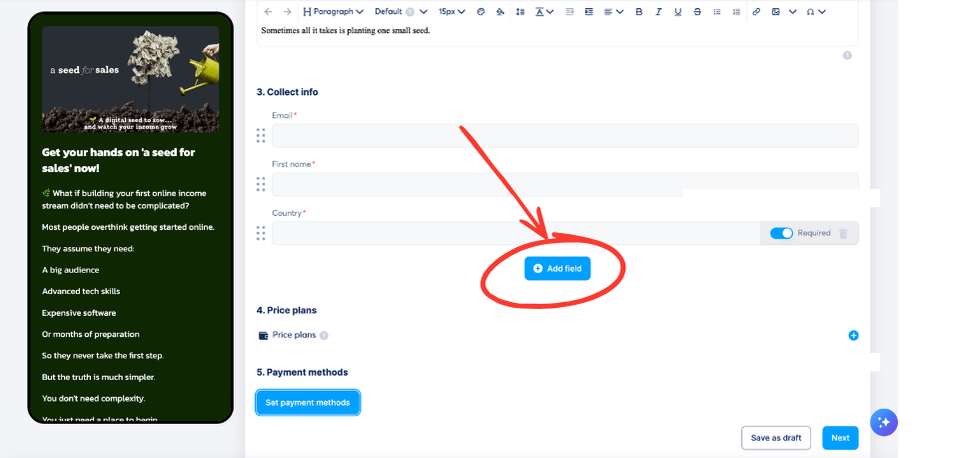
If you want to move the 'Last name' box so that it appears under the 'First name' box, you can drag the 'Last name' box so that it appears before country. It is also important to make sure that you have set the 'Last name' box to be required by selecting the 'Required' toggle switch.
If you don't add 'Last name' and set it to 'Required' may result in Systeme not allowing you to add the product to your store.
Now it's time to set the price for the product.
In the 'Price plan' section, click on the blue + icon on the right.
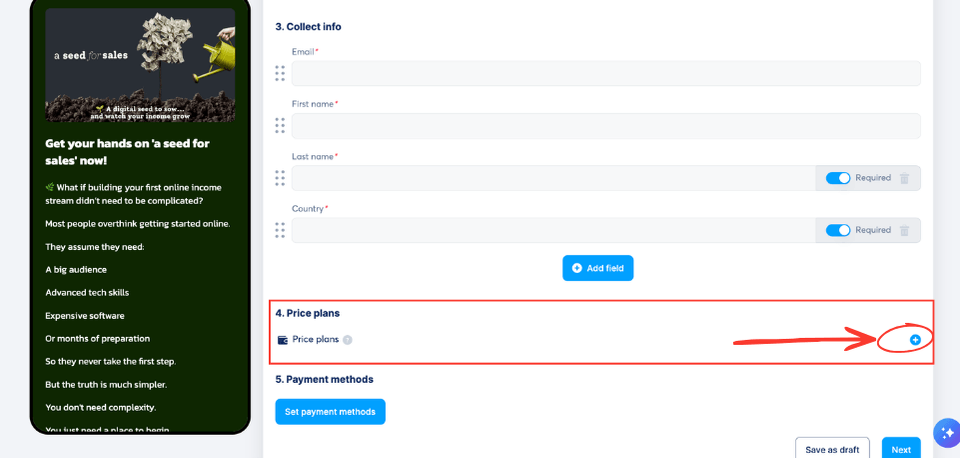
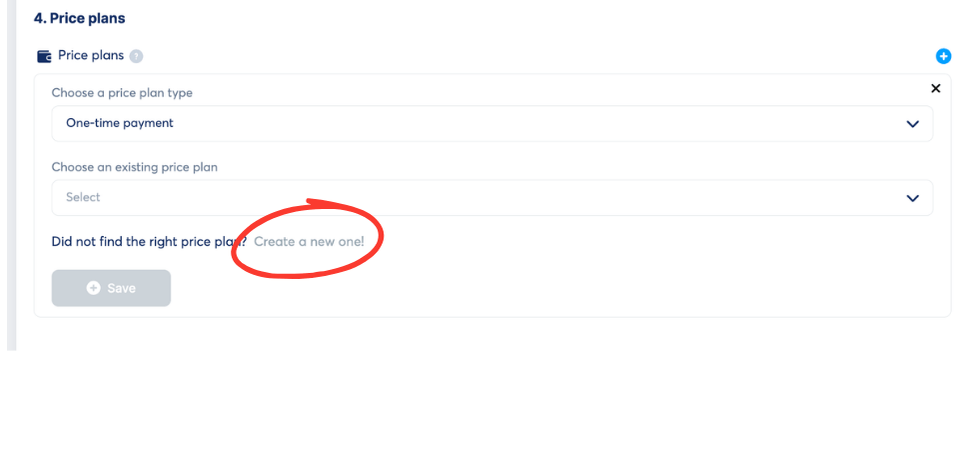
As this will be a one time payment, you can keep the price plan type set to 'One-time payment' - you would only change this for other digital products that have recurring payments such as subscriptions.
You wont have a price plan set up yet, so click on 'Create a new one'.
Enter the name of your product in the following boxes (as shown in the image below)
'Price plan name displayed on the order form',
'Price plan name displayed on your dashboard'
'Statement descriptor'
In the 'Payment amount' box, enter the price for the digital product - in this example I am adding a seed for sales which has a recommended retail price of £4 GBP.
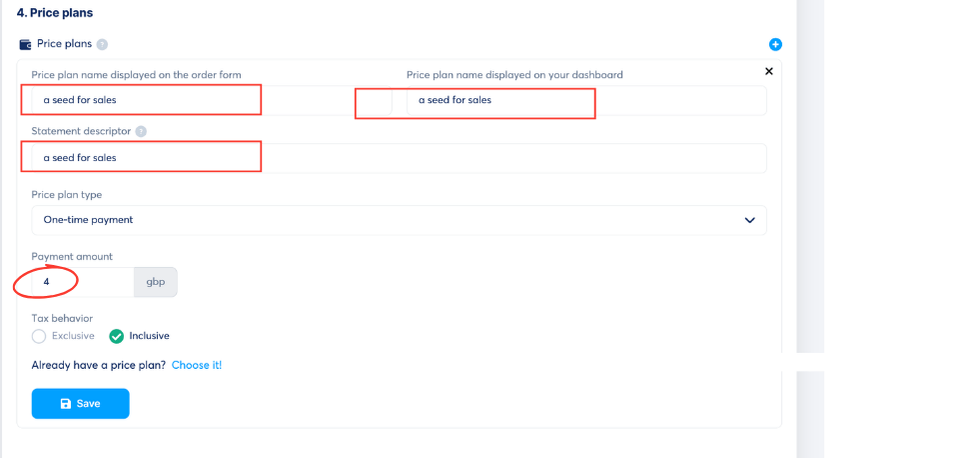
Click on the 'Save' button when you have entered these details in the price plan section.
In the next section of this page, you need to set the payment methods that you will be using to accept payments from. These are the payment gateways that you should have set up in part 2 of this guide.
IMPORTANT: If you haven't set up your payment gateways, you will need to do that before you can sell in your store. Go back and complete 'Part 2' of this guide if you didn't do this.
Click on the 'Set payment methods' button.
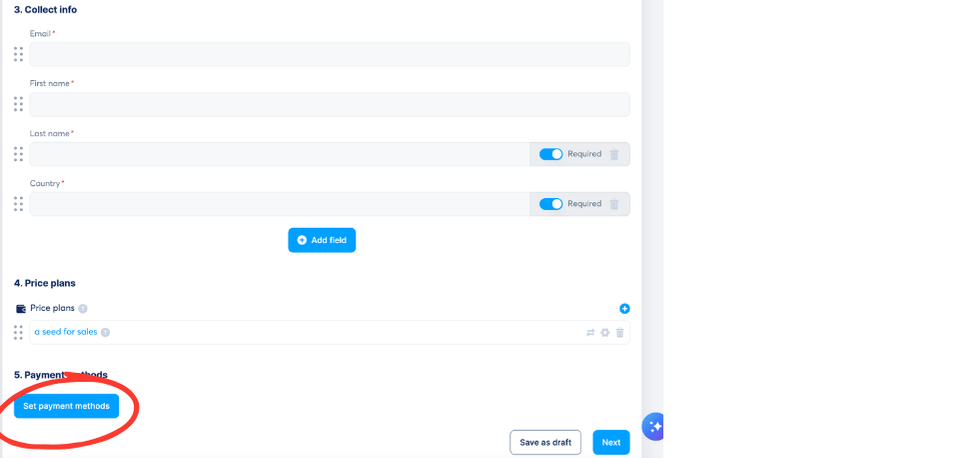
Set the currency for your digital product, and select the 'Accepted payment methods' you will accept for your digital product.
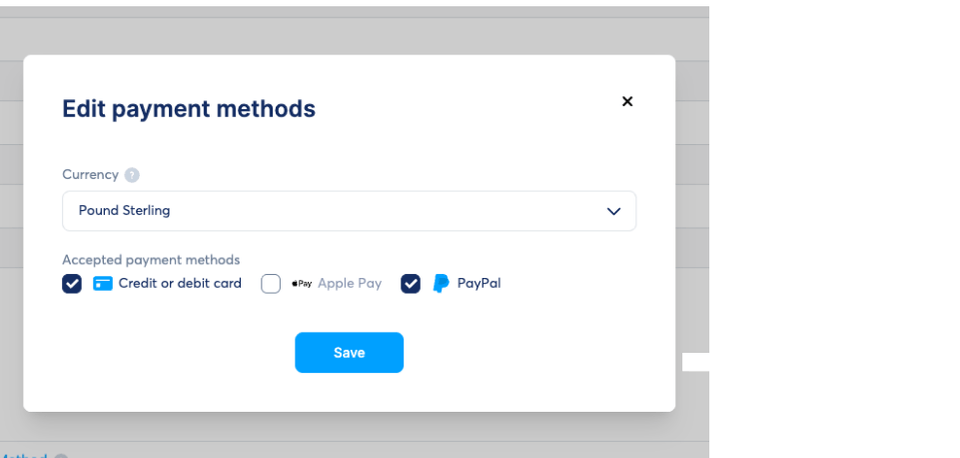
Click on the 'Save' button when you have finished.
Then, click on the 'Next' button to go to the final section 'Thank you page'.
The thank you page is what your customer will see AFTER they have purchased the digital product (in this case 'a seed for sales') from your store. You can customise the text on this page if you want.
Remember, the digital product will be delivered to your customer via email. Once you have customised the thank you page text, click on the 'Publish' button (as shown below).
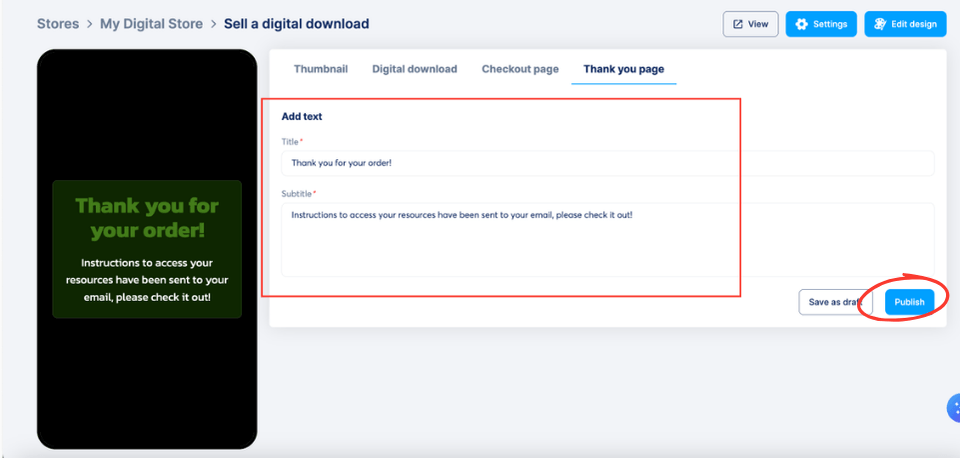
The digital product (in this case a seed for sales) will then be published to the store ready for people to purchase.
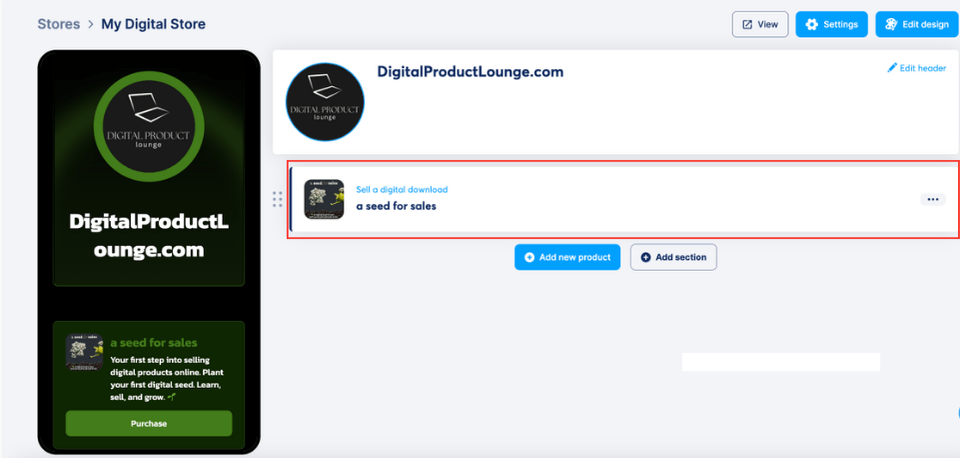
You can sell other digital products in your Systeme digital product store using the exact same method. Once your store has been set up, simply repeat 'Part 5' of this guide to add another product.
Part 6: Get the link to your store to start promoting your digital product(s)
Now that the store is set up and a digital product has been added to the store, it's time to start promoting your store and your products.
To do this, you need to get the web link / URL for your store.
In Systeme, go to your creator store which is under the 'Sites' menu then click on the 'View' button to view your store.
Your digital product store will then open in a new browser window. Look for the web address of your store (your address will be different to mine) - this is the link that you need to add to your social media profiles (Instagram, Facebook, TikTok, YouTube, Threads, Pinterest etc) to drive traffic to your store and sell your digital products.
🌱 Your Store Is Ready — Now Get People To Find It
Part 7 - Promote your store and product(s)
Setting up your digital product store is an important first step, but having a great product and a beautiful store isn't enough on its own.
You also need people to find you.
This is where digital marketing comes in.
Digital marketing is the process of getting your products and your business in front of the right people online.
This can include using social media, content, email marketing, short-form video, paid advertising, and other strategies to attract attention, build trust and drive traffic to your store.
The more you understand about how to attract the right audience, create content that gets noticed, and turn attention into customers, the better equipped you'll be to grow your digital product business.
You've now learned how to build the shop - the next step is learning how to bring people through the door.
🚀 Ready to learn more about digital marketing?
If you're serious about learning how to market digital products, build an audience and drive more traffic to your offers, explore the options below to discover the quality training programs we recommend.

Graphics
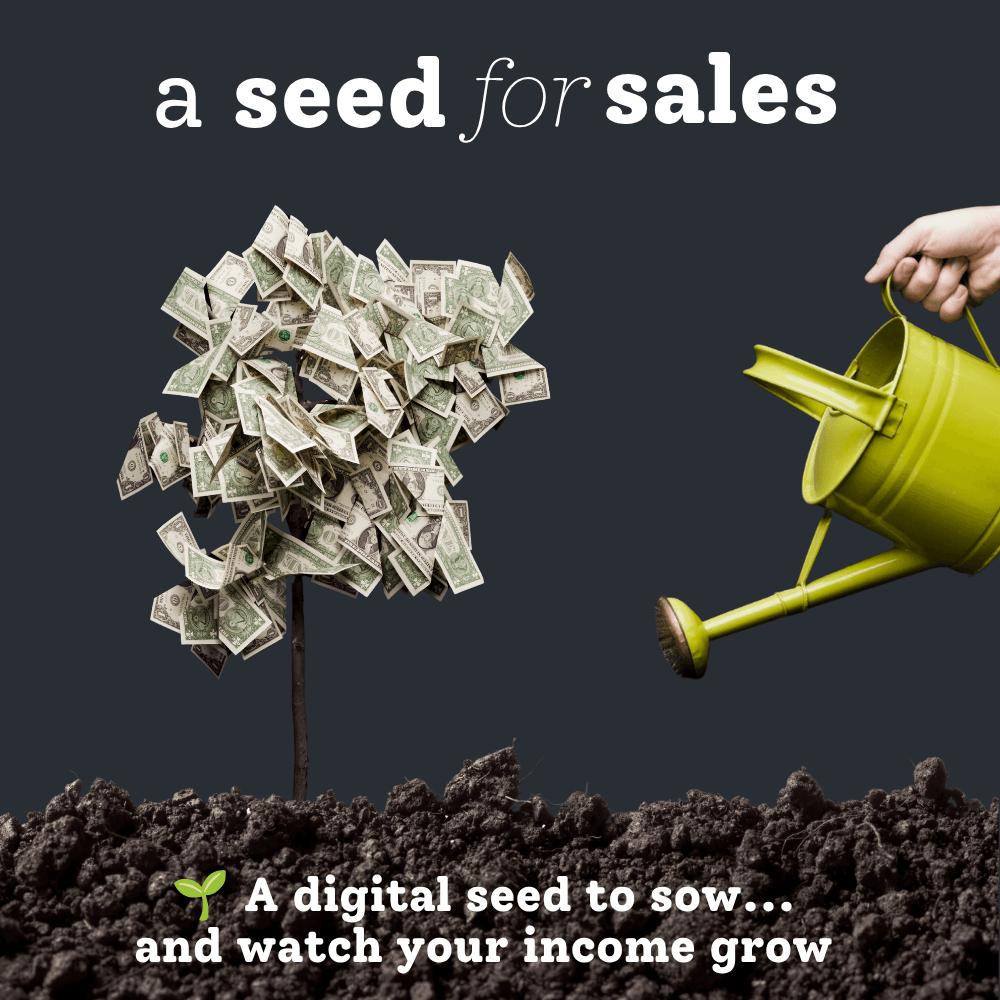
a seed for sales header image (square)
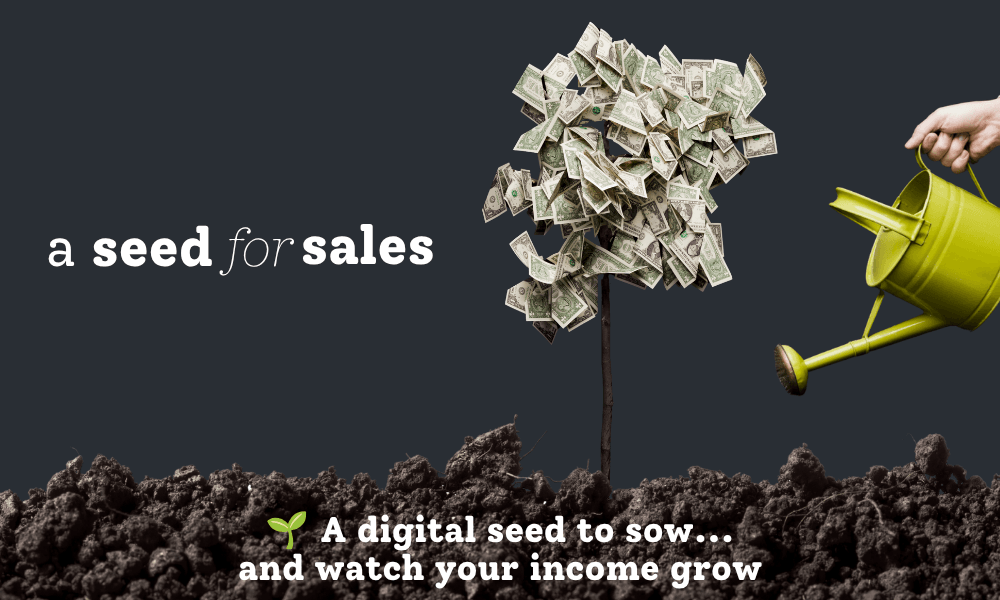
a seed for sales banner image
Sales Copy
🌱 Sales Page Copy
Copy this text and personalise it with your own voice before sharing.
🌿 What if building your first online income stream didn’t need to be complicated?
Most people overthink getting started online.
They assume they need:
- A big audience
- Advanced tech skills
- Expensive software
- Or months of preparation
So they never take the first step.
But the truth is much simpler.
You don't need complexity.
You just need a place to begin.
That's where a seed for sales comes in.
🌱 What this actually is
a seed for sales is a beginner-friendly PDF guide designed to help you understand how digital products work and how to start selling them online with confidence.
But this isn't just another guide to read and forget.
It also comes with Master Resell Rights (MRR), meaning you can legally resell it and keep 100% of the revenue from your own sales.
- No creating your own product.
- No writing your own guide.
- No starting from scratch.
Simply learn from it, then decide whether you'd like to sell it yourself.
🌿 The idea behind it
This isn't about getting rich overnight.
It's about planting one small digital seed and giving it the opportunity to grow.
Learn the process.
Take action.
Build confidence.
Make your first sale.
Then your next.
Every journey starts with a single step, and every tree starts as a seed.
🌱 What you'll discover
Inside a seed for sales, you'll learn:
- ✔ What digital products are and why they're so popular
- ✔ How people sell digital products online
- ✔ How to set up your own beginner-friendly digital store
- ✔ How to list your first digital product for sale
- ✔ Simple ways to start promoting your products online
- ✔ How Master Resell Rights work
- ✔ How to resell a seed for sales and keep 100% of your sales revenue
💷 Your first digital product is included
Unlike many beginner guides that leave you wondering what to sell, your first digital product is already included.
Once you've purchased a seed for sales, you'll have:
- 🌱 A practical guide to learn from
- 🌱 A digital product you can legally resell
- 🌱 The opportunity to start putting what you've learned into practice straight away
🌱 Why this works
People don't need another complicated business model.
They need a simple place to begin.
That's why a seed for sales works.
- ✔ Low-cost to get started
- ✔ Beginner-friendly
- ✔ Your first product is included
- ✔ No stock or shipping
- ✔ Learn and take action at the same time
It's designed to help you build momentum - not overwhelm.
❌ This is not for you if…
You're looking for:
- Overnight riches
- Money without effort
- A magic button that guarantees success
Because this isn't that.
Building anything worthwhile takes learning, consistency and action.
🌿 This IS for you if…
You want:
- ✔ A simple introduction to digital products
- ✔ A practical guide you can actually use
- ✔ Your first digital product ready to go
- ✔ The opportunity to learn and earn at your own pace
🌱 Plant your first digital seed today
For just £4, you'll receive a seed for sales, complete with Master Resell Rights.
Learn from it.
Sell it.
Keep 100% of the revenue from your own sales.
Your online journey doesn't need to start with a huge investment.
Sometimes all it takes is planting one small seed.